Background information
My own NAS system: my Unraid setup for the best overview and performance
by Richard Müller

My Unraid server is up and running. Now it’s time to teach it more. I’m diving into community apps, Docker containers, virtual machines and plugins.
In my last post, I set up the data storage and started the array. My Unraid server is ready for everyday use. But now I’m taking it a step further. For that, I need community extensions, containers and virtual machines (VM). This article outlines how I approached it and what considerations guided me. Again, this isn’t a step-by-step guide. You’ll find plenty of those on YouTube. Instead, you’ll get a look at how my setup works.
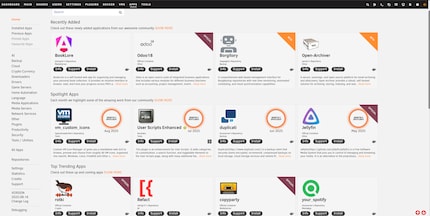
At its core, Unraid is a lean system. Its real strength only unfolds through community extensions. The Community Applications plugin is the main access point. It adds an unofficial yet essential app store to the interface.
From version 7.1.3 onwards, the plugin can be activated easily – the «Apps» tab leads straight to installation. Once installed, Community Applications, which is maintained by the community, provides access to a growing library of applications. It includes more than just apps like Nextcloud, Plex or Pi-hole. There are also numerous extensions for backups, monitoring and automation.

Without this plugin, I’d have to set up every Docker container manually. This includes path definitions, network options and custom parameters. With Community Applications, I get a searchable, filterable catalogue. It also adds smart presets and one-click installation. Any serious Unraid user won’t be able to avoid it.
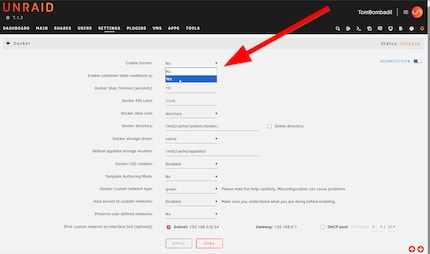
Most Unraid extensions run as containers. This holds true for media servers, backup tools and small web services. The concept is modern, flexible and resource-efficient; each app gets exactly what it needs. Before installing new tools, always check the settings: you have to manually enable Docker.
The related Docker data and configurations are stored in the appdata share. I previously assigned this share to the cache pool (primary storage: cache). This way, the containers benefit from short load times. At the same time, the array is spared frequent writes.
The Docker system itself also runs entirely on the cache. I also customise the network settings. I plan to give certain containers such as Plex, Pi-hole and Nginx Proxy Manager their own IP addresses.
One of Unraid’s most underrated advantages is its network flexibility. Containers can have their own IP addresses on the network. They then behave like independent devices. This is useful for services like the ad blocker Pi-hole. The Plex media server also benefits from being directly visible on the network, as this allows media files to be streamed directly on smart TVs or smartphones. With targeted network settings and firewall rules, it’s easy to create separate, secure environments that remain reliable, even with several containers running at once.

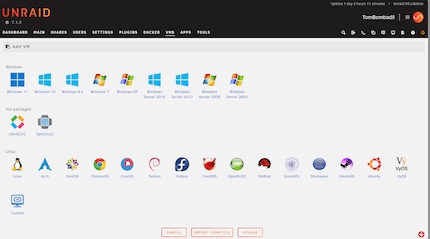
Not every application fits neatly into a container. Sometimes you need a full operating system. Unraid provides an integrated virtualisation environment based on KVM (kernel-based virtual machine).
It lets you run operating systems such as Windows, Ubuntu or macOS as virtual machines. In my setup, however, I use only Linux distributions. Why? Because they’re stable, resource-efficient and well maintained by the community.

I currently run several desktop distributions like Elementary OS, Zorin OS and Linux Mint, alongside several Ubuntu server VMs. These host, among others, the following services:
Some of these VMs are deliberately isolated within a virtual local area network (VLAN). This is a separate network I use for setting up new laptops or testing software independently from the main system. For instance, I currently have a test setup of ERPNext running on there. It’s an open-source ERP system that combines accounting, CRM and inventory management. I’m evaluating whether ERPNext could replace Bexio in the future. The goal is to centralise processes and reduce costs. An additional Portainer instance also runs in this VLAN on a Ubuntu server VM.
VM management is done entirely through Unraid’s web interface. Accessing it via virtual network computing (VNC) or secure shell (SSH) works smoothly too. In Unraid, resources such as CPU, RAM and storage can be assigned individually to each VM.
Plugins expand Unraid with features such as temperature monitoring, notifications and support for external drives. These are missing in the base system. The plugin manager makes it easy to find and install new extensions directly from the web interface. It also allows you to take care of updates and uninstalling in just a few clicks.
Handy, if you ask me. Here’s what I have running on my server:
My Unraid server is ready for everyday use. The storage structure is set up, the key community apps installed. Docker and virtual machines are enabled and configured, meaning I can run containers and virtual machines flexibly in the future. Thanks to selected extensions, the system remains modular and can be expanded at any time.
I’ve achieved exactly what I set out to do: build a digital sandbox to test new tools, host services for my business or simply experiment around – all without putting my productive infrastructure at risk.
I'm a journalist with over 20 years of experience in various positions, mostly in online journalism. The tool I rely on for my work? A laptop – preferably connected to the Internet. In fact, I also enjoy taking apart laptops and PCs, repairing and refitting them. Why? Because it's fun!
Interesting facts about products, behind-the-scenes looks at manufacturers and deep-dives on interesting people.
Show all